 | |||||||||||||||
 |
 |
 |
 |
 |
 |
 |
 |
 |
 |
 |
 |
 |
 |
 |
 |
How to use Vizserver to connect to the SGI Onyx4
If you haven't already, please read the Onyx4 page for an introduction to the system and an overview of its capabilities. You can consult the vizserver manpage (man vizserver) for reference, or read below for an overview of installing and using Vizserver software.
What's Vizserver?
SGI's OpenGL Vizserver software allows you to run OpenGL-based applications on the Onyx while controlling and displaying the applications over the network from your Windows, Macintosh, Linux, SGI, or Sun workstation. This capability allows one to use the Onyx4 to create visualizations without leaving your office. In order to make this work, you need the Vizserver Client software installed on your workstation and a CSB login to gain access to the Onyx.
CSB Login
If you do not already have a CSB user account, please visit the account request page for instruction. Make note of the username and password that you've chosen, as you'll need to provide that to the Vizserver client login dialog when prompted.
Install your Vizserver Client
Vizserver client software is a free download from SGI (login required). However, you need to take care that the version of the client you are running matches the version of the server that's running on the Onyx. For your convenience, we've provided local links to the proper clients below. These are Vanderbilt-only links. Do not redistribute this software.
- OpenGL Vizserver 3.5 for Windows NT 4.0, Windows XP, and Windows 2000
- OpenGL Vizserver 3.5 for Mac OSX
- OpenGL Vizserver 3.5 for 32-bit Linux
- OpenGL Vizserver 3.5 for Solaris 2.6 or later
- OpenGL Vizserver 3.5 for IRIX 6.5.11 or later
To install the client software onto a Microsoft Windows system, simply run the .exe installer that you downloaded above. For any of the other systems, you must first untar the tar archive and then follow standard software installation procedures for your operating system. If you need help with this, consult your local computer support staff. Detailed installation instructions and system requirements are provided in the download links from SGI (login required).
Run Vizserver and Connect to the Onyx
Find the vizserver client application and start it on your system. On Windows, it will be in the Start Menu. On the UNIX-based systems, you start it from the command line as /usr/bin/vizserver. On Mac OSX you must have X11 running and you must start it from an xterm commandline, not Terminal.app.
When vizserver initially starts, you should see the main vizserver dialog with a blank Host name typein. Below that is a line of text that reports your current status as "Disconnected". Below that is a row of buttons, with only the Log in button active.
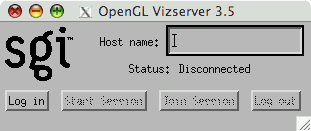
In the "Host name:" box, type onyx.structbio.vanderbilt.edu and click the Log in button. A new dialog will appear prompting you for your User/Password:
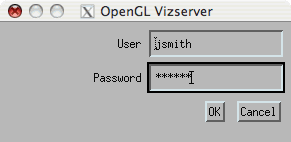
Enter your CSB login information and click OK. If you are properly authenticated, the User/Password dialog will go away and the Start Session and Log out buttons in the main vizserver dialog will now become active. Also, your Status will be reported as "Connected":
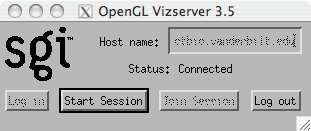
To start a vizserver session, click the Start Session button and the Vizserver Session Start dialog will appear:
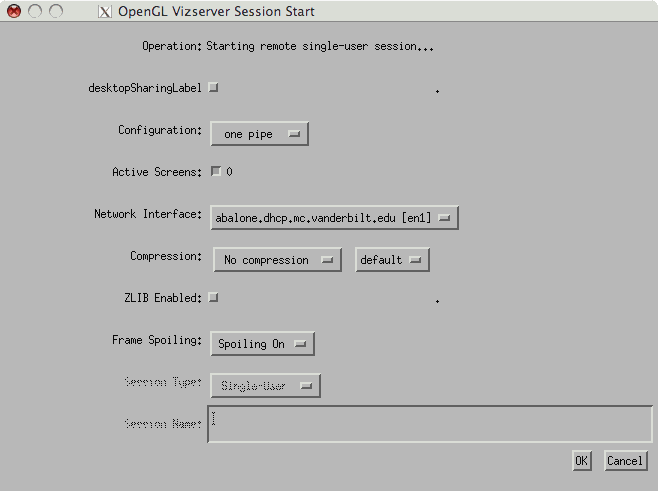
For information about the various Vizserver session options, you should refer to its manpage (man vizserver). Note that we don't have a license for the Collaboration features of vizserver so those sections of the documentation can be safely ignored.
The default selections in the Vizserver Session Start dialog are generally fine with the exception of the Compression dropdown. If you attempt to run Vizserver over a 100Mbit interface with no compression you are likely to get poor interactive framerates with your application. I like to use lossless compression if I have a good network connection and/or if I can live with a small application window. Otherwise, try Delta Color Cell or JPEG compression at various compression ratios to see what you prefer. If you are connecting over an 802.11b wireless link, you may have to choose higher compression ratios, which will result in severely degraded image quality, to get interactive framerates. If you don't get it right the first time, don't worry - you can change the compression settings at any time during your session (more on that later).
The Desktop Sharing button will place the entire vizserver session inside its own local window on the client. This is useful for situations where you have multiple physical desktops (e.g. Xinerama) on your Vizserver client and you wish to move vizserver windows between them and/or you wish to manage all Vizserver windows as a single object within your local window manager.
Once you have selected your session settings, click the Ok button. After a brief delay, you should get an IRIX console window and command prompt that looks similar to the following:
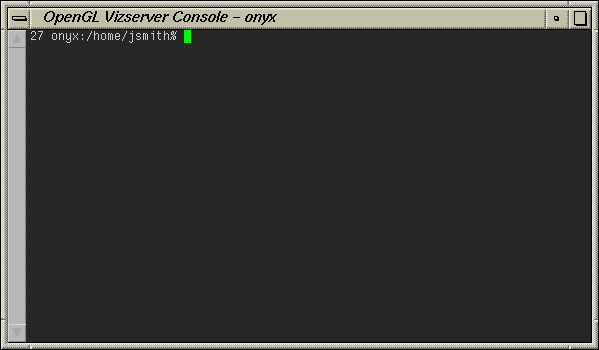
This window is a shell that is running on the Onyx but instead of being displayed to a local (to the Onyx) display device, the graphics frame buffer on the Onyx is read back by the Vizserver server software, compressed, and shipped to your Vizserver client over the network. This is how application remote control and viewing works, too.
To start an application, type the name of the program at the command line (for amira, it is just "amira") and press enter. The resulting application window(s) will appear back on the desktop of your vizserver client, but the application is actually running and being rendered on the Onyx hardware. At this point, you will use the application as you normally would if you were sitting at the Onyx console. Note that the speed of the application's display will be a function of the application window sizes, your compression settings, and the quality/congestion of the network connection between your client and the Onyx.
Once your session is active, the Vizserver Start Session Start dialog will be replaced with the Vizserver Session Control Dialog:
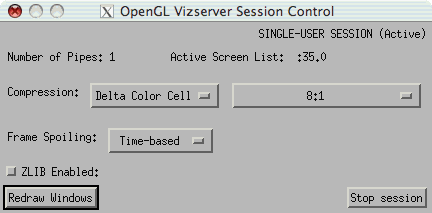
From this dialog you can adjust compression settings during the active session to tune the application redraw performance and image quality to current network conditions and/or your own visual requirements. Generally, a hardwired 100MBit ethernet connection is sufficient to get a reasonable combination of display speed (framerate) and image quality (compression ratio). When you have a slow network connection, it's sometimes convenient to use a high compression ratio (fast redraw, poor image quality) while you are manipulating an application, then switch to a low compression ratio (slow redraw, high image quality) for closer, static inspection.
Other Important Notes
- If your client is running its display at a resolution higher than that of the Vizserver graphics pipe configuration (1280x1024 as of this writing), you will get a warning to that effect. You can continue using Vizserver, but you will discover that the Vizserver windows will only be drawn correctly on a portion of your screen unless you enable the Desktop Sharing feature discussed above.
- Do not leave vizserver running if you step away from the computer. This is a limited resource, currently with only one session available at a time. Save your work and exit, leaving the resource available for others to use while you are away.
- Vizserver can be used at the same time someone is using the graphics console in 5119, but there is only one Amira license to share between Vizserver and the graphics console.
- If you have questions or problems with the Onyx or Vizserver, open a trouble ticket.
|
VU Home |
VUMC Home |
People Finder |
University Calendar
Jarrod Smith- modified on January 30, 2009 |