 | |||||||||||||||
 |
 |
 |
 |
 |
 |
 |
 |
 |
 |
 |
 |
 |
 |
 |
 |
Cryogen Fill
Cryogen fill at Vanderbilt
This page gives an overview of the cryogen filling procedures for our instruments at Vanderbilt.Contents:
2. N2-fills on the individual Instruments:501, 502, 601, 602, 800
Responsibilities
INSTRUMENT |
PERSON RESPONSIBLE |
|
|
|
|
|
|
|
|
|
|
|
|
|
|
|
1. Cryogen Tanks
General word about cryogen's:
- Boiling point of liquid Nitrogen: 77K or -196 oC, which is below that of oxygen
- Approximate expansion rate; volume of gas @ 15 oC, atmospheric pressure produced by a unit volume of liquid at normal boiling point: 700x
- Toxicity: minimal in well ventilated areas
- Wear gloves to prevent cold burns
- Gloves must be loose fitting, so that they can be removed easily in case of a liquid spillage
- Wear an appropriate eye protection
|
|
Liquid Nitrogen is extremely cold and can cause severe cold burns! |
Back to: Contents or NMR resources home
Nitrogen
Supplier:
There are two kinds of dewars we usually have on site:A-L Compressed Gas
875 Visco Drive
Nashville, TN, 37210
Phone: (615) 254 1457
Fax: (615) 254 1460
- 230l high pressure liquid N2 on wheels (~200 psi)
Used for the CD and UV spectrometer, sometimes on site for VT-air usage on the NMR instruments.
- 230l low pressure liquid N2 on wheels (max. 20 psi)
- There is standing N2 order with A-L for both facilities.
- A-L typically delivers the dewars Monday mornings.
- It is good practice to have an empty dewar available by Monday mornings, so when a new dewar comes in, the empty one can be picked up. We have to pay extra for whatever dewar is sitting in our facility on the 1. of the month.
- Empty dewars can be called in if they are in excess of the one being picked up on Mondays anyway.
Used primarily to fill the magnets and sometimes for low temperature experiments on the spectrometer.
Normally
the NMR staff will arrange for the nitrogen dewars to be on hand. If you
need more, let them know. Should you have to call A-L, make sure you supply
A-L with the proper P.O. We have a separate P.O. for the analytical facility
and the structural biology one.
A-L most often leaves a yellow deliver slip on the tank. We collect them for book keeping reasons. Please deposit these slips at the following places:
NMR Facility: Shelve over the sink
Chemical Sciences NMR Facility:
Leave delivery slips in the box @ Markus' office SC 5123
Back to: Contents or NMR resources home
Details about the cylinders
Liquid N2 tank on wheels |
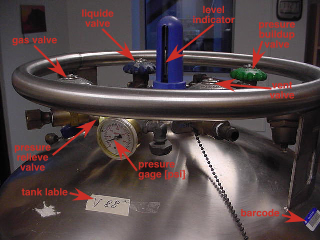
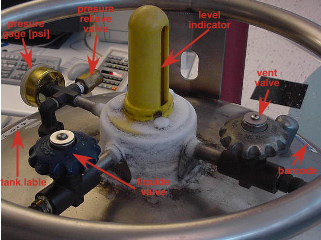
Typical arrangement of valves on a N2 tank |
||
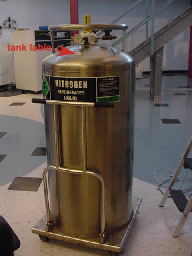 |
Typical dual pressure tank (high/low pressure) on the left, single pressure tank (high OR low) on the right. |
||
1. After the tank is delivered, it needs
to be labeled at the pressure gage with a:
2. The last 5 digits of the barcode, the tank number and the date need to be noted in the list posted at the cryogen door 3. As the magnets are being filled, note on this label, how many minutes you have used on which magnet. |
Typical tank for high and low pressure
|
 |
It is possible for the valves to freeze up. This most likely happens during a fill, when the valve was wet at the beginning. To prevent this from happening, move the valve every so often. There are wrenches to close a frozen valve in an emergency. Be aware that they are magnetic and will be attracted by the magnet! |
Back to: Contents or NMR resources home
2.
N2-fills on the individual Instruments:
The N2-fill procedure is in general the same for all the magnets and so are the risks and safety precautions. These are some things to remember:
- If you do not feel comfortable with what you are about to do, call for help!! Call on the person responsible for the system first, before you call Markus.
- The most destructive thing during a fill is having liquid N2 drop on to any O-ring, cable or other electronics like the preamplifier.
- Make sure the hoses point away from the magnet and all cables / electronics
- Never leave the magnet while filling it
- Check the liquid valve periodically for freeze up
- Always wear protective gear: Safety glasses and gloves
- Never move the dewar during a fill, the rubber hose will break and cause liquid N2 to spill, causing possible burn wounds or damage to the magnets.
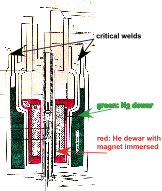
- The N2 dewar is a cylindrical can wrapped around the He can inside the magnet dewar. Because of heat transfer, the can is free hanging on the three or four Nitrogen ports, only supported by some spacers on the bottom. Therefor care has to be given to the welds on top of the fill ports. Make sure they are not iced up, when you start a fill.
- Never leave the N2 ports open any longer than absolutely needed for the changes of tubes or heat exchangers.
- Always make sure there is positive pressure on the N2 ports, e.g. N2 gas flowing out.
 |
Check the pressure on the hose; a good flow is indicated by the hose slightly vibrating. |
Back to: Contents or NMR resources home
- Release the air from the anti-vibration legs
- 501: No anti-vibration legs
- 502: Shut off valve on the wall (air usage for anti-vibration legs).
- 601, 602: Shut off valve on the rear magnet leg.
- 800: Anti-vibration legs not in use
- Close the magnet bore:
- Move dewar close to the magnet:
- Be careful not to move the dewar through the 5 G line of any other magnet, that might have an experiment running.
- Make sure the handle points away from the magnet. On some dewar it comes loose very easily and could fall onto the magnet.
- Get the dewar relatively close to the magnet, but don't hit the magnet. Also remember, should the valve freeze, you don't want to be too close, so you can bring the necessary tools.
- Be careful maneuvering the dewar through narrow door frames and along walls - take your time!
- Set up of magnets for N2 transfer:
- The rubber transfer hoses:
- Hoses for vent port:
- Heat gun and gloves:
- Hook up the rubber hose on the liquid outlet of the N2 dewar, make sure it fits well over the male threads.
- Remove heat exchanger on the fill port of the magnet. Make sure there is no ice.
- Open the valve on the liquid port on the dewar and let it run a few seconds, then shut it off again. The purpose of this is:
- Flush the tube with N2
- double check the pressure in the tank
- Don't go too long or the hose might freeze or get too moist.
- Hook the tube up to the fill port on the magnet. Make sure it is tight, particularly on the 502!
- Remove the other vent ports on the magnet as necessary on each system (see pictures)
- Hook up the small tubes on these vent ports and direct them away into the open space.
- Slowly open the liquid valve on the dewar and start the fill. As the rubber hoses get cold, make sure they are properly positioned. This is particularly important for the vent hoses!!
- Increase the N2 flow slowly until a good transfer is achieved indicated by a slight vibration of the rubber hose.
- When filling the 800: Hook up the hose in the wet-lab area. You will need a metalic wrench, that is highly attracted by the magnetic fields. Leave the wrench in the wet-lab area at all times!
- Move the dewar with the hose attached close to the 800 magnet.
- 800: open the clamp on the fill port
- N2 dewar is under pressure!
- Screws on clamp are slightly magnetic
- Watch out for the O-ring!
- Open the valve on the liquid port on the dewar and let it run a few seconds, then shut it off again. The purpose of this is:
- Flush the tube with N2
- Double check the pressure in the tank
- Don't go too long or the hose might freeze or get too moist.
- 800: Insert the metal rod into fill port and close it with the clamp.
- Remove the other vent ports on the magnet as necessary on each system
- 800: Open the clamp on the vent port (right side) and hook up the metal flex tube using the clamps. Tie up the flex tube on the rail, making sure the N2 gas blows into the open space.
- Slowly open the liquid valve on the dewar and start the fill. As the rubber hose gets cold, make sure it is properly positioned.
- Increase the N2 flow slowly until a good transfer is achieved indicated by a slight vibration of the rubber hose.
- Fill N2:
- Make sure everything is hooked up properly
- Work expeditiously
- Start the fill by slowly open the liquid valve on the dewar and start the fill.
- As the rubber hoses get cold, make sure they are properly positioned. Thi s is particularly important for the vent hoses!!
- Increase the N2 flow slowly until a good transfer is achieved indicated by a slight vibration of the rubber hose.
- Increase the flow by opening the liquid valve to maintain the slight vibration of the rubber hose
- Check the liquid valve for operation, making sure it does not freeze up
- Do not fill too fast, a fill after 7 days should last about:
- When is the magnet full ? - closing it off
- Once liquid N2 spills out on the open port, the magnet is full
- The liquid valve on the dewar needs to be closed immediately
- Use the heat gun to blow off the snow formed on the fill- and vent hoses
- Warm up the fill hose at the port, remove and close it:
- 501: rubber hoses connecting to the flow meter
- 502: pressure valve fitting
- 601 and 602: heat exchanger
- 800: cover flange with clamp
- Immediately after, remove the vent tubes from the ports and lose them:
- 501: rubber hoses connecting to the flow meter
- 502: heat exchanger
- 601 and 602: heat exchanger
- 800: cover flange with clamp
- How do I recognize an empty dewar during a fill?
- The most obvious sign is given by the transfer hose stopping to vibrate. One might recognize this in two ways:
- 800: A visual inspection of the transfer hose does not show liquid anymore
- 502: The N2 level on the monitor does not increase
- Finishing and clean-up
- Turn on the air for the vibration legs on the 502, 601 and 602
- Remove transfer hose from the dewar and put it back to its place:
- Store hoses for vent port:
- On the label of the N2 dewars note, which magnet you have been using this dewar on and for how long. Then store the dewar:
- If the dewar is empty, take a new label and clearly mark the dewar as EMPTY.
- select spectrometer and click go
- add your username (the one you use for NMR time reservations)
- add the date
- make any comments like partial fills
- click add to post the N2 fill on the schedule
This takes quite a while (up to 5 min) to release all the air.
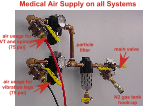
 |
 |
Back to: Contents or NMR resources home
The magnet bore, where the sample is
inserted needs to be closed with the black stopper. This prevents any moisture
to drop into the magnet.
Back to: Contents or NMR resources home
 |
When filling the 800:
Hook up the hose in the wet-lab area. You will need a metalic wrench, that is highly attracted by the magnetic fields. Leave the wrench in the wet-lab area at all times! |
Back to: Contents or NMR resources home
It is important, that the N2-fill
is done consistently, e.g. the fill tube from the dewar should always be
hooked up on the same port of the magnet.
- A label indicates which port to hook
up
- Material:
NMR Facility: For the 502, 601 and 602 the transfer hose is at the sink in the wet lab of the facility. The 800, the transfer hose with the metal adapter attached on both sides is on the magnet supply box behind the magnet.
Chemical Sciences NMR Facility: The transfer hose for the 501 is at the sink next to the 400 magnet (SC 5132C).
- 501, 502, 601 and 602: The short vent tubes are on the vibration legs or next to the magnets.
- 800: The metal flex tube and the yellow rope to fix the tube on the rail are behind the magnet supply box.
NMR Facility: They are in the drawer across the refriger ator in the wet lab.
Chemical Sciences NMR Facility: They are in the drawer underneath the refrigeration unit next to the 400 magnet (SC 5132C).
- Individual steps:
501, 502, 601, 602:
800:
 |
Careful:
|

Make sure all the vent tubes are directed
away from the magnet into empty space!
Back to: Contents or NMR resources home
As stated above:
- 800: One can see the liquid N2
flow in the tube
- Depending on the flow, a hum might be
heard, which is normal
- 501: 25 min
502: 30 min
601, 602: 40 min
800: 50 - 60 min
Back to: Contents or NMR resources home
- make sure it is closed tightly
position the screw properly since it is slightly magnetic (see picture)
- Caution:
Make sure the port is completely dry, otherwise the O-ring inside the heat exchanger does not close properly
Make sure the connecting tube at the top is not kinked and the N2 gas can flow out freely, the hose might have to be supported by the clamp screw of the He-port
|
|
|
|
|
 |
 |
 |
 |
| All 3 ports are connected back to the
rubber hoses combining and connecting to the N2 flow meter.
The white towels soak up any condensing water and need to be tight around the N2 stacks. Change them when dirty or unclean! |
Make sure the hose after the heat exchanger is not kinked!! | The heat exchangers need to be seated properly on the pots again. | The clamps on either side need to oriented
properly and closed well.
Inspect the O-ring for cracks before putting it back on. |
Back to: Contents or NMR resources home
The following signs indicate a dewar running empty during a fill:
- - visually
- touch the transfer hose and it will be calm
If you suspect an empty dewar stop
the fill and close the ports off properly. Continuing to blow N2
gas into the magnet dewar depletes it from liquid N2 to the
point where it might run empty!
Therefore it is very helpful if the label
on the N2 dewar has a proper list of which magnet has been filled
for how many minutes with this dewar. (See note in the introduction of
the dewars)
Back to: Contents or NMR resources home
- - For the 502, 601 and 602 is at the sink
in the wet lab of the facility, the one for the 501 is at the sink next
to the 400 magnet.
- For the 800, the transfer hose with the metal adapter attached on both sides is on the magnet supply box behind the magnet.
- - The short vent tubes are on the vibration
legs of the 502, 601 and 602, and in the 501 room
- The metal flex tube and the yellow rope to fix the tube on the rail are behind the magnet supply box
- - In the wet lab of th e facility, in the
drawer across the refrigerator
- In the drawer underneath the refrigeration unit next to the 400 magnet
- - In the cryogen room at the facility
- behind the service elevator in SC 5113
Double check, whether you see the N2
flow meter pick up some flow and the place is cleaned up.
Make the appropriate entry on the web page:
- Nitrogen Fill Log Page
Back to: Contents or NMR resources home
3. Organization
Resposibilities:
- People in charge of a magnet system:
- First and foremost, the person responsible for any magnet system has to make sure that the magnets are being filled with liquid N2 every week. A magnet should be filled within 7-10 days of a previous fill. Exceptions might be discussed with Markus.
- If this person is out of, the NMR staff has to be informed about the substitution plan.
- If nobody is signed up on a spectrometer, this person is responsible to organize the fill for that day/week.
- These persons are the first contact if a user has a question.
- Help new users filling the magnets.
- Initially, they might be present and assist during each fill
- Individual users:
- Fill the magnet with liquid N2 on the system he is using, whenever the schedule indicates a fill needed.
- Make sure in advance there is enough liquid N2 on site, otherwise inform the NMR staff
- If you can not do the fill or need some help, make the appropriate arrangements
- The people in charge of a system have
the following responsibilities:
INSTRUMENT |
PERSON RESPONSIBLE |
|
|
|
|
|
|
|
|
|
|
|
|
|
|
|
- Each individual user has the following
responsibilities:
Back to: Contents or NMR resources home
|
VU Home |
VUMC Home |
People Finder |
University Calendar
Markus Voehler- modified on January 30, 2009 |
